

Fine‑Dining Food Photography: Capture Culinary Craft with Expert Techniques
Photographing plated cuisine is about translating technique, premium ingredients, and atmosphere into a single frame that suggests taste, texture and story. This guide explains how fine‑dining photography differs from casual food shots by focusing on light quality, composition, styling, equipment and current trends—skills tailored to ingredients like A5 Wagyu, caviar and considered omakase plating. We move from lighting fundamentals to composition, luxury styling, gear choices and editing workflows, offering practical, service‑ready direction for photographing high‑end dishes. You’ll also find focused examples inspired by Kaviar’s Japanese fine‑dining approach to help you translate omakase sequences and signature protein presentations into compelling imagery. Read on for natural and artificial lighting strategies, sushi‑and‑meat composition rules, prop and styling guidance for premium ingredients, camera settings and post‑processing steps, plus 2024 trends to keep your visuals current.
How Can Lighting Enhance Fine Dining Food Photography?
Light defines perceived quality: it sculpts texture, creates sheen and sets mood. Good lighting reveals Wagyu marbling, the translucence of fish and the glossy beads of caviar—details that sell flavor. Treat illumination as a sculptor treats clay: use it to create depth rather than flatten the plate, then manage shadows to emphasize tactile cues. Below are concise, practical takeaways for both window‑lit and low‑light restaurant conditions.
Lighting takeaways to apply immediately:
- Place your key light slightly off axis to reveal surface texture and avoid flatness.
- Soften harsh highlights with diffusion while preserving specular shine on glossy ingredients.
- Match color temperature to warm restaurant light to keep food and skin tones natural.
These three points prepare you for natural‑light tactics that make the most of windows and golden‑hour warmth through direction and controlled diffusion.
What Are the Best Natural Light Techniques for Restaurant Food Photos?

Natural light renders believable tones and gentle transitions that elevate fine‑dining imagery. Position dishes for side or backlight from a window to reveal marbling and fish translucence without blowing highlights, and use a neutral reflector to fill shadows subtly. When direct sun is unavoidable, diffuse it with a scrim or collapsible panel to keep directional modeling while removing hard shadows—this preserves delicate highlights on caviar and lacquered sauces. For evening service in dim interiors, plan shoots around golden hour where indirect window light balances warmer fixtures, and bracket exposures to protect highlight detail for later tone‑matching in post.
How to Use Artificial Light, Diffusers, and Reflectors Effectively?
Artificial light gives precise control over color and falloff when natural light is scarce. Compact, dimmable LED panels are restaurant‑friendly: use a single key LED with a softbox or diffusion to mimic window modeling, tune color temperature toward warm when matching tungsten, and add a low‑power reflector to lift deep shadows while keeping contrast. Use a grid or snoot on a rim light to isolate glossy highlights on caviar or a seared crust, and flags to cut spill that softens texture. Calibrate white balance in‑camera with a gray card or custom preset so colors are accurate before you shoot, then refine warmth or mood subtly in post.
What Composition Rules Create Stunning Food Photography?
Composition organizes visual information so the viewer understands the dish’s focal point, structure and narrative. In fine‑dining work, composition elevates minimal plating into a story about craft. Combine rule‑of‑thirds placement, negative space and leading lines to guide the eye to premium ingredients and convey a sense of restraint. Choose angles that suit the dish—overhead for arranged spreads, 45° for layered plates and eye‑level for tall elements—so angle and composition work together to highlight texture and depth. The next section breaks down three actionable composition rules and gives practice exercises to build visual intuition.
Three quick composition rules for immediate use:
- Rule of Thirds: Place the main element at an intersection to create balanced, dynamic interest.
- Negative Space: Let empty plate or table area convey restraint and focus attention on a single premium component.
- Leading Lines: Arrange garnish, sauce strokes or cutlery to direct the viewer toward the focal ingredient.
These rules set the stage for dish‑specific framing choices—overhead, 45° or eye‑level—so you can decide quickly during service.
Before detailing angle choices, the table below maps common dish types to recommended shooting angles and framing tips to speed decision‑making on busy nights.
This composition map helps you choose an angle fast, balancing kitchen constraints with visual intent.
How Does the Rule of Thirds Improve Dish Presentation Photos?
The rule of thirds improves dish photography by placing points of interest at visually pleasing intersections, which naturally draws the eye and creates harmony. Use it to tell a story—placing a caviar‑topped bite on a third intersection signals importance while leaving negative space to suggest exclusivity. Treat the rule as a starting point: combine it with diagonal plating or leading lines for movement, then refine focus and aperture to keep the intended plane sharp. Practice by photographing the same plate at different thirds positions to see how balance alters perception—this trains you to adapt to varied omakase and signature plating styles.
Which Angles and Framing Techniques Showcase Fine Dining Dishes Best?
Angle choice depends on whether a dish is flat, layered or tall. Overhead works for flat arrangements like sushi spreads where pattern and negative space matter; 45° favors stacked meats and layered presentations to show depth and texture. Eye‑level or slightly low angles suit drinks and tall garnishes, while macro lenses at low angles reveal micro‑texture—Wagyu marbling or caviar beads. Combine tight crops to emphasize texture with wider frames to include contextual props, and pick aperture and focus plane to isolate the subject without losing story‑bearing context.
How to Style Luxury Dishes for Captivating Food Photography?
Styling luxury dishes calls for restraint, textural contrast and careful handling of light‑reactive surfaces so premium ingredients read as refined and tangible on camera. Minimalist garnishes that mirror the dish’s flavors create rhythm without competing, while dark ceramics or matte cutlery provide contrast that highlights sheen on fatty meats and pearls. Control reflections on glossy sauces or metallic props with polarizing techniques and precise light placement so gloss reads delicious rather than distracting. The sections below cover ingredient‑specific styling for A5 Wagyu and caviar and suggest a prop palette that supports a luxury narrative.
Before comparing prop choices, the table below clarifies how common props affect perceived luxury and visual contrast.
This quick prop guide helps you choose materials that complement premium plating without stealing focus from the dish.
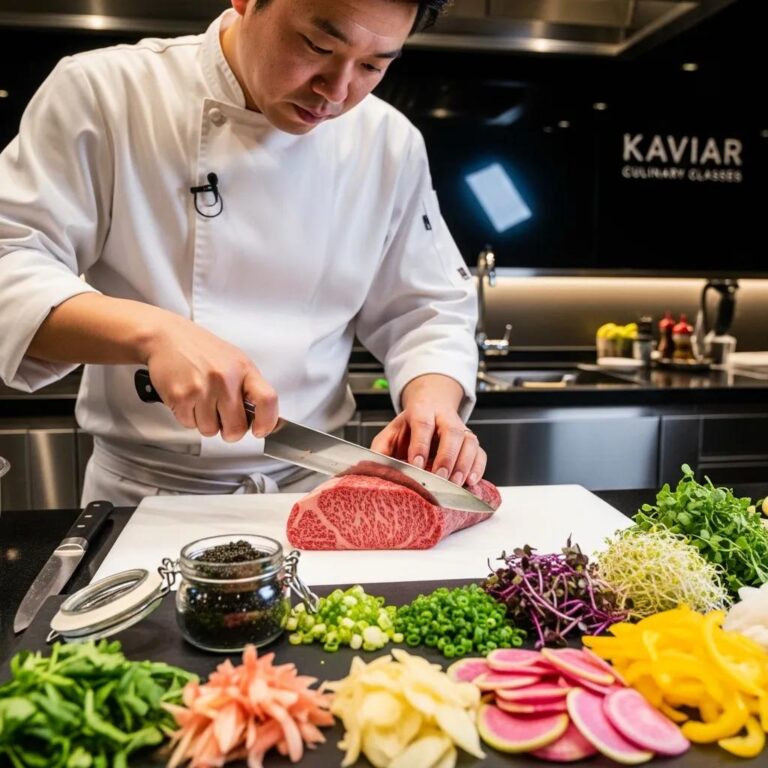
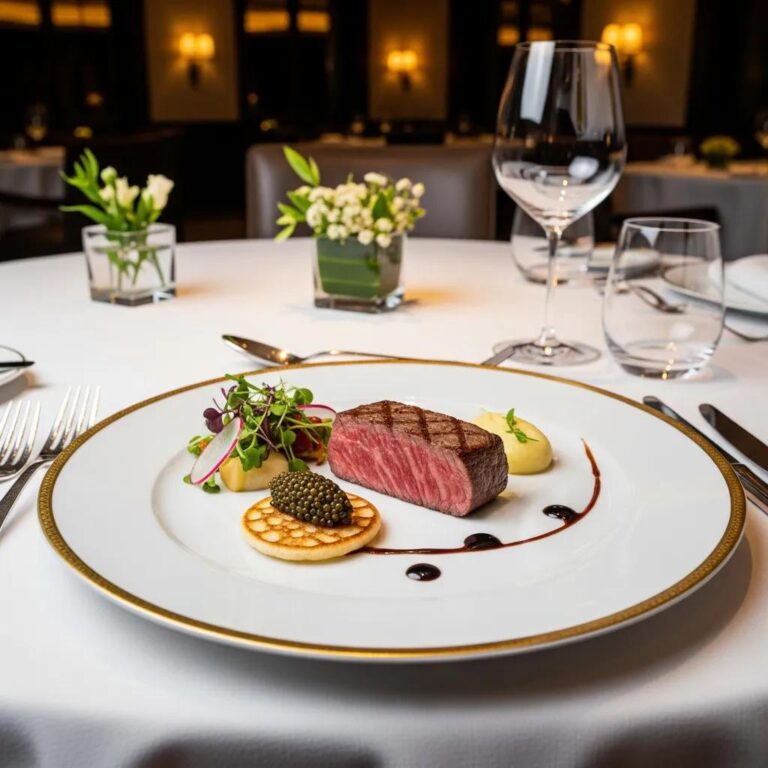
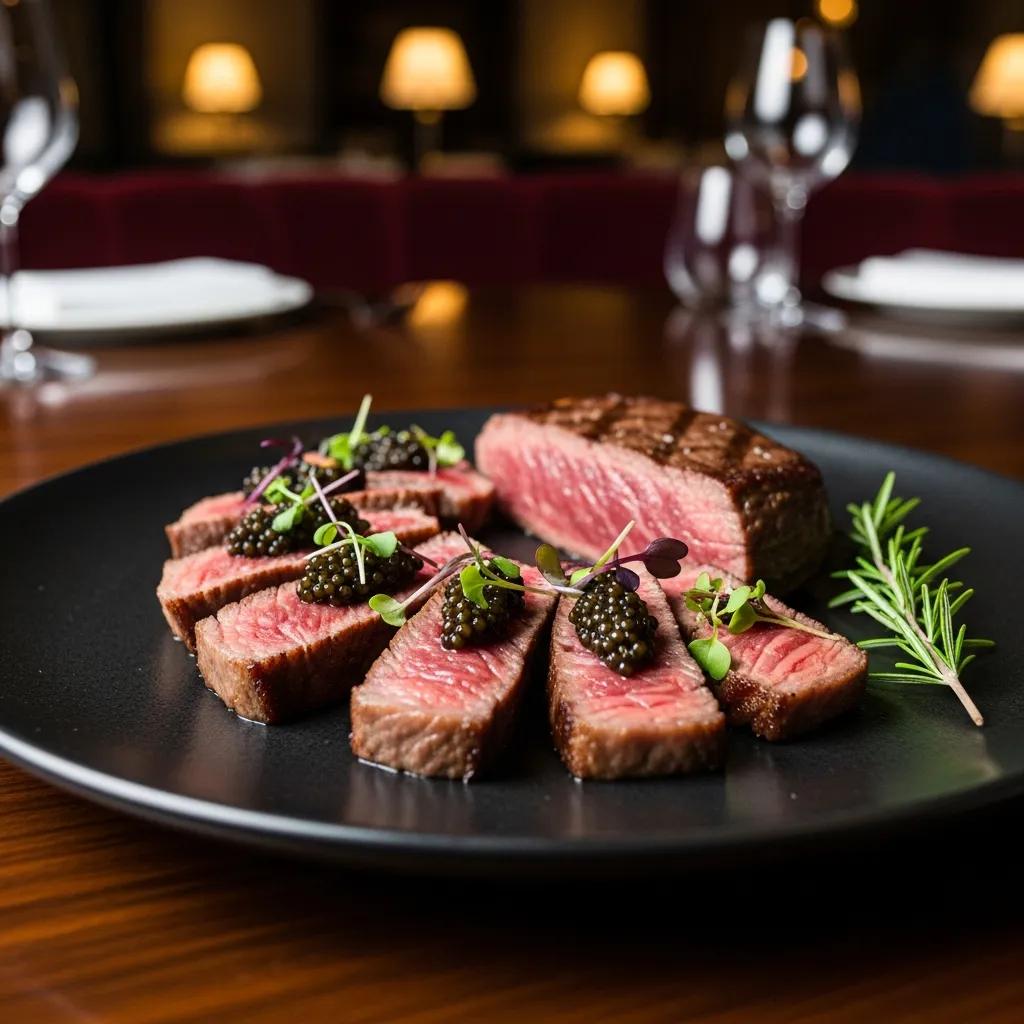
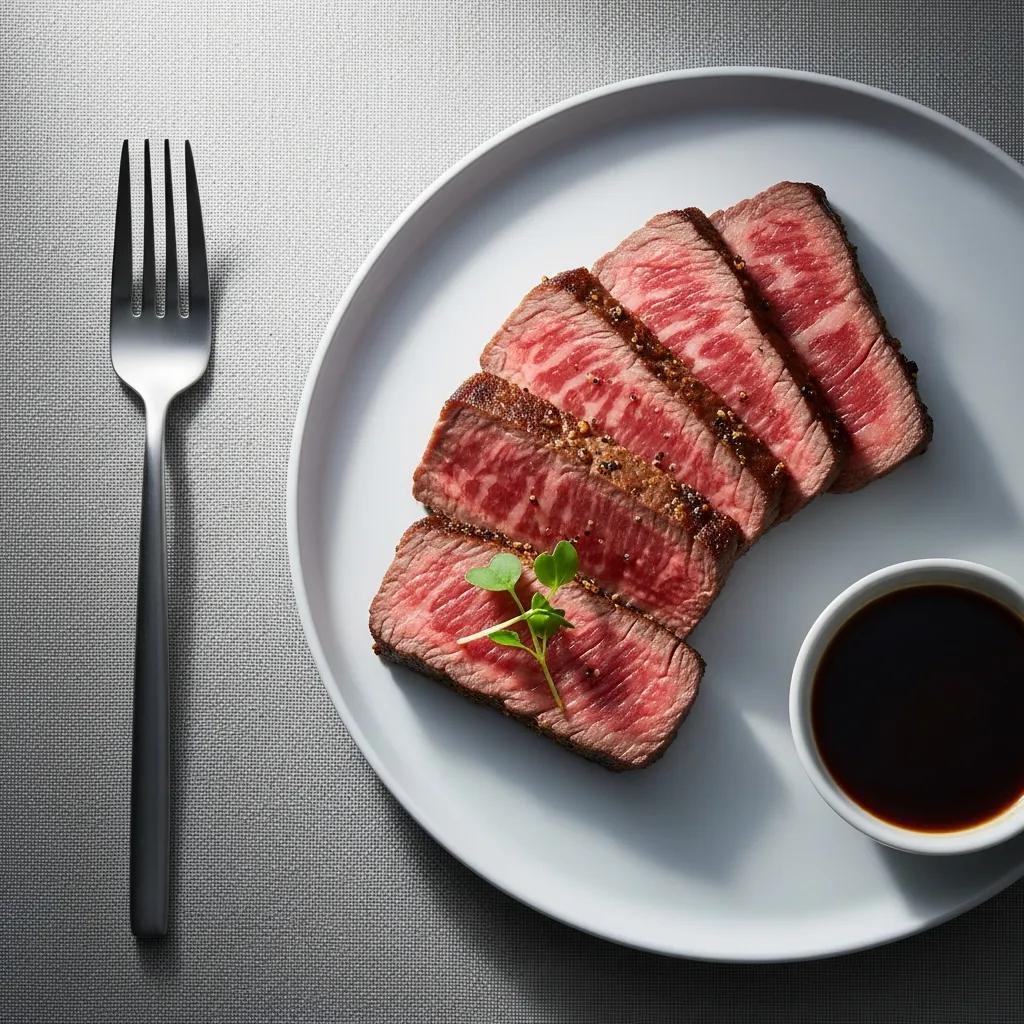
What Are Key Food Styling Tips for Highlighting Premium Ingredients Like A5 Wagyu and Caviar?
To highlight A5 Wagyu and caviar, focus on texture, contrast and minimalism so richness reads as desirability, not excess. Use side or backlight to reveal Wagyu marbling and surface sheen and a shallow depth of field to separate the protein from its plate; a narrow focus plane will emphasize fat translucence. For caviar, keep garnishes minimal and use dark or neutral plates for tonal contrast so each pearl reads clearly; manage specular highlights to avoid blown whites that erase nuance. When appropriate, include a small human element—chef’s hand or tweezers—at the edge of frame to convey craft and scale without pulling focus from the ingredient.
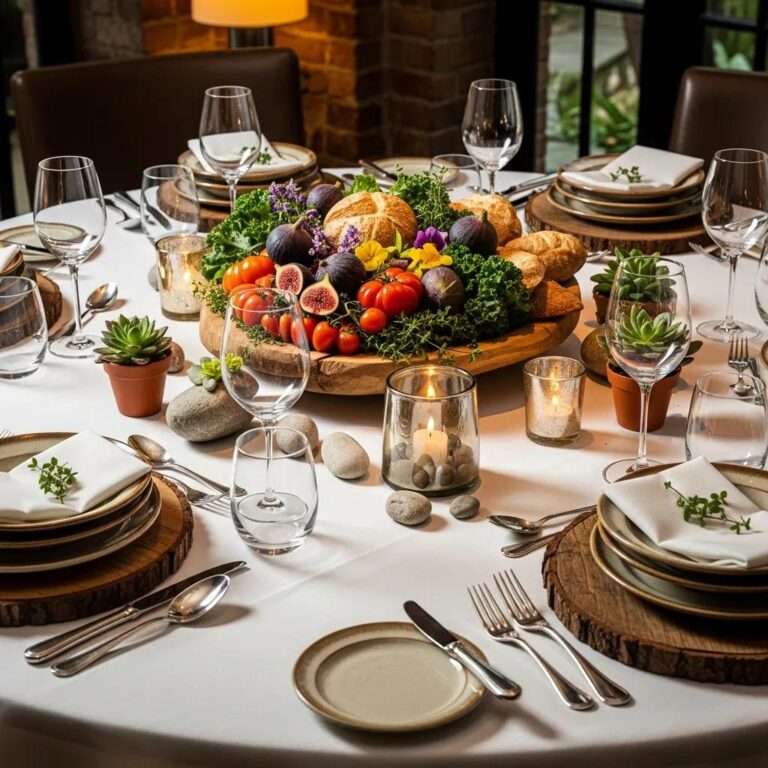
How Can Props and Storytelling Elevate Fine Dining Food Images?
Curate a restrained prop palette that supports the dish’s origin and story: a lacquer tray for Japanese‑inspired omakase or a single folded linen for an intimate meat course. Use narrative prompts—ingredient source, a chef’s gesture, or a plated bite mid‑assembly—to add context without cluttering the frame, and keep a consistent color scheme across images to strengthen brand identity. Human elements like a chef’s hands or a pouring motion convey process and craft while ensuring props remain subordinate to the plate. Thoughtful prop choices will guide your framing and motion decisions.
Which Equipment and Editing Techniques Are Essential for Professional Food Photos?
The right gear and a disciplined editing workflow keep texture, color and mood intact. Equipment choices affect depth of field and low‑light performance; editing preserves authenticity while shaping tone. Bring a compact tripod, a fast prime for shallow depth of field and a small LED panel or flash to control light in dim rooms. Editing priorities: accurate white balance, selective texture enhancement and restrained grading to achieve a moody, luxurious look without overdoing it. Below is a camera‑settings checklist and a short gear‑to‑setting comparison for quick service decisions.
Use this gear checklist during service to prepare:
- Aperture and focus plan: Aim for f/1.8–f/3.5 to isolate subject and place focus on the most textured surface.
- ISO strategy: Keep ISO low where possible; raise shutter speed with stabilization to avoid motion blur.
- Stability: Carry a compact tripod and use mirrorless EVF aids for precise framing in low light.
Below is a concise gear‑to‑setting comparison to match common equipment choices with recommended aperture and use cases.
This equipment table simplifies lens and aperture choices under service constraints so you can pick the right tool for each dish.
What Camera Gear and Settings Work Best for Fine Dining Photography?
Choose gear that supports shallow depth of field and clean low‑light performance: a fast prime (50mm or 85mm on full‑frame) produces pleasing bokeh for plated proteins, while a 35mm equivalent is useful at cramped counters. Set aperture between f/1.8 and f/4 depending on context; use higher f‑stops for multi‑component spreads to preserve depth. Keep shutter speed high enough to avoid handheld blur—use a tripod in very low light—and select the lowest ISO that gives proper exposure to protect texture. Bracket exposures for very shiny or dark subjects to safeguard highlights and pull balanced tones in post.
How to Apply Post‑Processing to Enhance Authenticity and Mood?
Post‑processing should protect color accuracy and texture while enhancing mood. Start with white balance and exposure, then apply targeted local adjustments to bring out marbling or pearl detail. Use selective clarity or texture on proteins and garnishes, recover highlights selectively to reveal specular detail, and add a subtle vignette to guide attention without obvious manipulation. For a moody aesthetic, deepen shadows and warm midtones modestly; always compare edits to the original to ensure the image still reads as food, not an effect. Export with slightly more contrast for social and a flatter, neutral base for editorial prints.
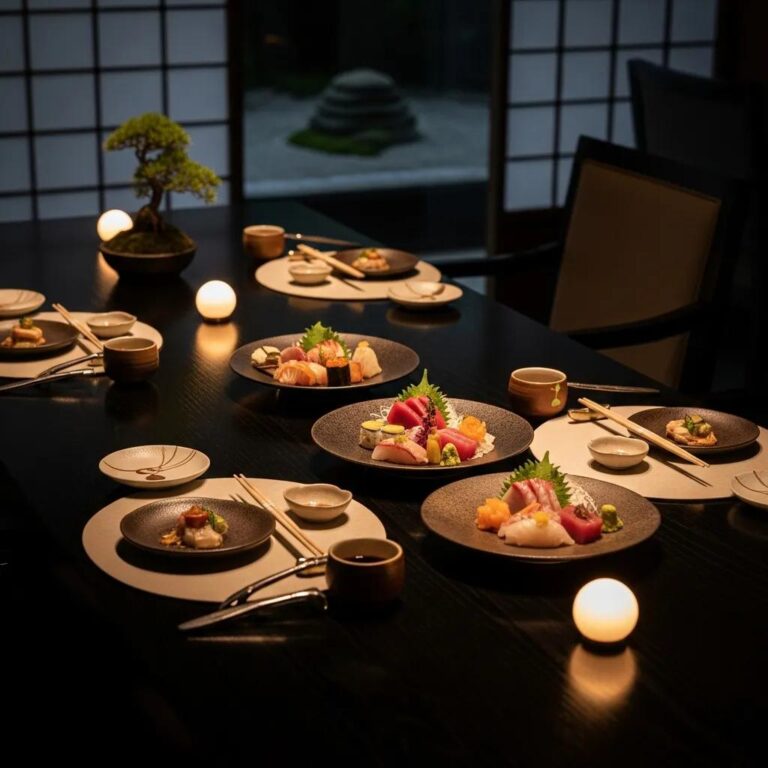
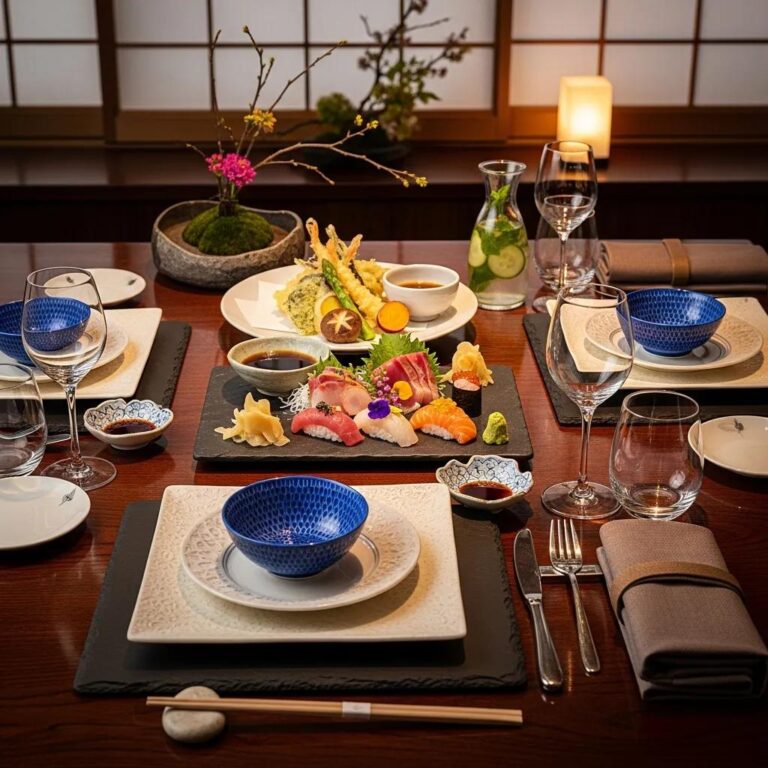
How Can Kaviar Restaurant’s Signature Dishes Inspire Your Food Photography?
Kaviar’s approach to Japanese fine dining—thoughtful omakase sequences, pristine sushi and premium ingredients like A5 Wagyu and caviar—shows how technique, plating and ingredient quality create photogenic narratives. Study Kaviar‑style plating to see how minimal garnishes, dark ceramics and restrained sauce gestures guide composition and accentuate texture. Below are mini case studies pairing a photography directive with an on‑plate choice you can emulate. After practicing these targeted shots, consider a tasting service to observe chef technique and lighting in context.
Kaviar‑inspired shot list and tips:
- Omakase sequence: Photograph the chef’s hands, plated progression and single‑piece macro shots to illustrate craft.
- A5 Wagyu presentation: Side light and a narrow depth of field emphasize marbling and fat translucence.
- Caviar accents: Use dark, low‑reflective plates and controlled highlights to show individual pearls.
These examples remind us that experiencing dishes in person improves photographic decisions; if you want to study plating and lighting directly, reservations at Kaviar are available through RESY, OpenTable or by phone so you can observe service and technique up close.
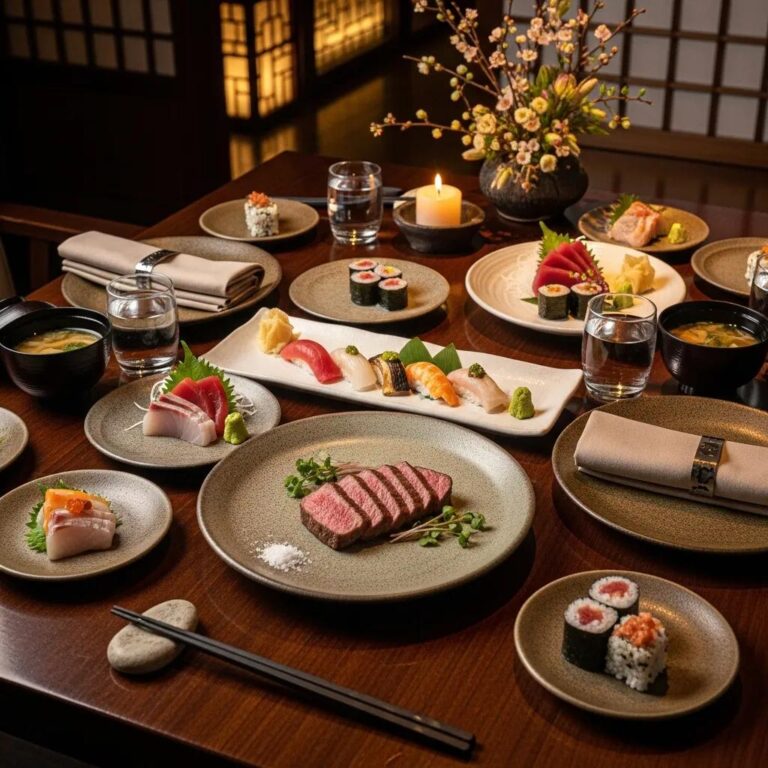
What Photography Tips Are Ideal for Capturing Omakase and Sushi Presentations?
For omakase and sushi, work from a focused shot list that balances process and finished plates: document chef plating to show craft, use overheads for multi‑piece spreads and 45° angles for nigiri to highlight fish sheen and rice texture. Include the chef’s hands in placement shots to add narrative and keep negative space to convey restraint. For macro texture, use a macro lens or an 85–105mm prime at close focus, side‑light the piece to reveal translucence and pin focus on the fish surface so grain and moisture pop. These approaches preserve immediacy and authenticity essential to Japanese fine‑dining imagery.
How to Photograph A5 Wagyu and Caviar Dishes to Reflect Culinary Artistry?
When shooting A5 Wagyu, prioritize marbling and surface rendering: use side or backlight to pick out delicate fat veins and a moderately narrow aperture to isolate the most appetizing plane. For caviar, choose apertures that keep clusters of pearls in focus while softening the surroundings, and use dark, low‑gloss plates for clear tonal contrast. Control specular highlights on both ingredients by adjusting light angle and using small diffusers or flags to prevent blown highlights that erase detail. These choices ensure images honor the ingredient’s sensory qualities and respect the chef’s craft.
What Are the Latest 2024 Food Photography Trends for Fine Dining Restaurants?
In 2024, fine‑dining photography favors authenticity, moody grading and short‑form motion to communicate craft and provenance—an editorial sensibility adapted for mobile formats. Photographers are experimenting with controlled imperfections—tasteful drips or crumbs—to humanize images while preserving elegance. Motion elements like slow‑motion pours or chef sequences work well as short clips for social and, when paired with cinematic grading, reinforce a restaurant’s narrative. The bullets below summarize trends and how to apply them practically.
Key 2024 trends and applications:
- Authentic imperfections: Use selective candid moments to convey process without sacrificing presentation.
- Moody color grading: Deepen shadows and warm midtones to emphasize richness in premium ingredients.
- Motion and short‑form video: Capture plating sequences and micro‑movements to tell a sensory story on social platforms.
These trend applications translate directly into shot lists and editing choices that keep your work contemporary and platform‑ready.
How Does Authenticity and Imperfect Styling Influence Food Photography?
Authenticity and imperfect styling signal human craft and real dining experiences, which can be more appealing than overly polished imagery. Controlled imperfections—a single sauce smear or a slightly off‑axis garnish—create action and immediacy; used sparingly they enrich the narrative without undermining luxury. Maintain hygiene and intentionality: keep only those imperfections that add story and avoid anything that reads careless. That balance preserves a premium image while connecting emotionally with viewers through the humanity behind the plate.
What Role Do Motion and Moody Aesthetics Play in Modern Food Images?
Motion and moody aesthetics amplify process and ingredient richness: motion (slow‑mo pours, hands at work) communicates ritual and craft, while moody grading deepens depth and color saturation to suggest concentrated flavor. For motion, plan short vertical clips with stable, flicker‑free lighting; for grading, apply subtle temperature shifts and lowered highlights to create a tactile, cinematic feel. Together they make immersive content that performs well on social platforms while reinforcing a restaurant’s premium positioning through sensory storytelling.
Frequently Asked Questions
What are the essential camera settings for low-light food photography?
In low light, use a wide aperture (f/1.8–f/3.5) to let more light reach the sensor and achieve a shallow depth of field. Keep ISO as low as practical to limit noise, raising it only to maintain a usable shutter speed. Use a tripod for longer exposures to ensure sharpness and bracket exposures when working with shiny or very dark dishes to capture highlight and shadow detail.
How can I effectively use negative space in food photography?
Negative space is the empty area around your subject that helps emphasize it. In food photography, negative space communicates elegance and restraint. Place the main element off‑center, letting the surrounding emptiness draw focus to the food. Experiment with different balances of subject and space to find compositions that elevate the plate’s presence.
What types of props work best for fine dining food photography?
Choose props that support the dish without overwhelming it. Dark ceramics create strong contrast for vibrant ingredients, while matte linens add subtle texture. Minimalist, brushed‑metal cutlery accents elegance without distracting reflections. Select props that reflect the cuisine’s origin and palette so they complement colors and textures rather than compete with them.
How can I ensure color accuracy in my food photos?
Start by setting accurate white balance with a gray card or a custom in‑camera preset so colors match the real plate. In post, adjust color balance and saturation conservatively to preserve authenticity. Consistent lighting also helps maintain color fidelity across a shoot, so aim for reliable, repeatable light sources where possible.
What are some common mistakes to avoid in food photography?
Common errors include flat or harsh lighting that loses texture, cluttered compositions that distract from the dish, and mismatched backgrounds that weaken presentation. Avoid blown highlights on glossy surfaces and ensure your focus is sharp on the most textured part of the dish to maximize appetite appeal.
How can storytelling enhance my food photography?
Storytelling brings context and emotion to images. Capture elements that reveal origin or preparation—ingredient vignettes, a chef’s hands, or plated action—to build a narrative. Use props and composition to guide the viewer’s eye through the story, turning a photo of food into a compelling visual moment that resonates with your audience.
Conclusion
Mastering fine‑dining food photography elevates how culinary craft is perceived. By applying measured techniques in lighting, composition and styling, you can capture the essence of premium ingredients like A5 Wagyu and caviar and translate them into images that compel attention. Use these practical tips to refine your approach, develop a consistent visual language and create photographs that genuinely reflect the artistry on the plate. Explore our resources and practice deliberately to showcase your culinary storytelling.